Marine Diesel Engine Maintenance — The Seasonal Checklist That Prevents Breakdowns
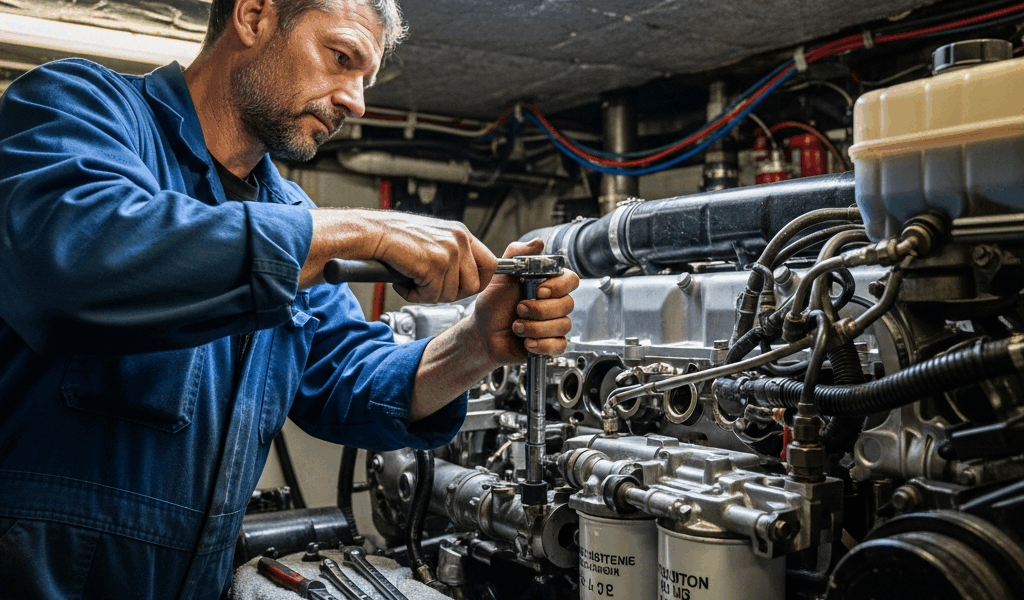
Marine diesel engine maintenance has gotten complicated with all the conflicting advice flying around — forums saying one thing, YouTube saying another, and your marina neighbor swearing by whatever his grandfather did on a two-stroke. As someone who’s owned a 1987 Catalina 36 with a Yanmar 3GM30F for eleven years, I learned everything there is to know about getting this wrong before I got it right. Skipped an impeller check before a two-week cruise. Ran contaminated fuel through a brand-new Racor filter. Forgot to drain the raw water circuit before a hard freeze one November in the Chesapeake. What follows is the checklist I actually use now — built from those mistakes and from long conversations with mechanics at boatyards in Maryland and Maine who’ve watched the same failures repeat themselves, season after season, like clockwork.
This isn’t brand-specific. It covers Yanmar 2GM and 3GM engines, Beta Marine 25–60 series, Volvo MD and D1/D2 series, and Westerbeke units — the engines you actually find in the sailboat slips at most marinas. If you’re trying to avoid a $2,000 haul-out tow and a week waiting on a mechanic, read this before you splash in the spring.
This article includes affiliate links. We may earn a commission at no extra cost to you.
Pre-Season Spring Commissioning Checklist
Spring commissioning is where the season is won or lost. Don’t make my mistake — I rushed through commissioning once because I wanted to be sailing by the first weekend of May. Blown impeller on day three of a cruise to the Bay islands. The kind of thing that’s funny later and absolutely isn’t funny at the time.
Oil and Filter Change
Change the oil even if you changed it at haul-out. Oil absorbs moisture and combustion acids during storage — that’s what’s sitting in your engine right now after a winter on the hard. You don’t want that circulating through fresh bearings on the first run of the year. Yanmar specifies 15W-40 CD-rated oil for the 3GM30F. Beta Marine recommends 15W-40 or 20W-50 depending on your ambient temperature. Volvo D1 and D2 engines call for VDS-3 rated diesel oil or better. Torque the drain plug to spec — 20–25 Nm on most Yanmars, which honestly isn’t very tight. The Fram CH6007 fits the 3GM30F. The Volvo 3831236 is the correct OEM filter for the D2-40. Cross-reference your service manual before substituting aftermarket filters. Apparently some people skip this. Those people have bad days.
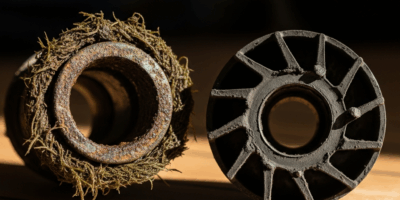
Raw Water Impeller Inspection
Pull the impeller. Every spring. No exceptions. A rubber impeller that’s been sitting dry all winter develops flat spots and small cracks that fail the moment the engine loads up in warm water — sometimes within the first hour. The Jabsco 1210-0001 is the common replacement for Yanmar 2GM and 3GM engines. Beta Marine 25 and 38 units typically use a Johnson F5B-8. Budget $25–$45 for the impeller itself, and have the cover gasket on hand too. The gasket on older Yanmars almost never survives being removed intact — plan on replacing it. While you’re in there, inspect the housing for scoring. Deep grooves mean the pump body itself needs replacing, not just the impeller.
Coolant Check
But what is a coolant problem, exactly? In essence, it’s contamination you can’t see until it’s too late. But it’s much more than that — it’s often the first sign of something catastrophic happening inside the engine. Freshwater-cooled engines — the Yanmar 3GM30F, most Beta Marine units, all Volvo D1/D2 engines — use a closed loop that still needs annual attention. Check the level in the expansion tank. Check the color: green or pink-red depending on your coolant type, not brown, not milky. Milky coolant means combustion gases or raw water are getting into the loop — that’s a head gasket conversation. Drain and replace coolant every two years regardless. Yanmar specifies a 50/50 mix of ethylene glycol and distilled water. Tap water is not distilled water. This matters more than most people think.
Fuel Filter Replacement
Replace the primary filter element — the Racor 500 series with a 10-micron element is the standard setup on most Yanmar and Beta installations. Replace the engine-mounted secondary filter too. While you’re at it, inspect the Racor bowl for water or dark sediment sitting at the bottom. Dark sediment means the tank needs to be inspected and possibly cleaned before you leave the dock. New primary elements run $12–$18. This is genuinely not a place to economize — a clogged filter offshore is a miserable problem with a completely avoidable cause.
Zinc Inspections
Shaft zinc, prop zinc, hull zincs — check them all. More than 50% consumed means replacement, not “one more season.” The pencil zincs inside the heat exchanger get overlooked constantly and are frequently responsible for corroded heat exchanger tubes. The pencil zinc on a Yanmar 3GM threads into the side of the heat exchanger and takes a standard 1/2-inch wrench. Four minutes to check. Skip it for two seasons and you’re looking at a $600 heat exchanger replacement — which is what makes the zinc endearing to those of us who’ve done the math.
Mid-Season Running Checks
Probably should have opened with this section, honestly — because most engine failures happen mid-season, not at commissioning. Things that were borderline in April quietly become failures under sustained summer use, usually somewhere inconvenient.
Belt Tension Every 50 Hours
The alternator and raw water pump belt on most small marine diesels should deflect about 10–12mm under moderate thumb pressure at the center of the longest span. Too loose and the alternator undercharges your batteries. Too tight and you kill the alternator bearings ahead of schedule. I pushed down on a belt once, thought it felt about right, motor-sailed 40 miles to Annapolis, and found a shredded belt sitting in the bilge the next morning. Carry a spare belt. Always. A Gates 15A0900 fits many Yanmar 2GM and 3GM applications — it’s the kind of $18 item that earns its keep eventually.
Raw Water Strainer
Check the raw water strainer before every departure. Not every 50 hours — every single time you leave the dock. Jellyfish, sea grass, plastic grocery bags — any of these can block a strainer in minutes and cause an overheat faster than you’d expect. If you’re in a jellyfish-heavy anchorage in late July or August — Chesapeake boaters know exactly what this means — check the strainer again after an hour of motoring. That’s not excessive caution. That’s just how July works on the Bay.
Exhaust Water Temperature and Color
Stand at the stern and watch the exhaust for a moment after startup. Water should be flowing consistently with the exhaust gases. Sputtering or dry exhaust is an impeller failure until you prove otherwise — stop the engine immediately. Black smoke points to fuel delivery problems or air filter issues. White smoke from a warm engine means coolant contamination. These aren’t things to monitor and hope improve. They don’t improve. They escalate.
Oil Level Monitoring
Check the oil level at every fuel stop — or at minimum every 10 running hours. Small marine diesels in hard use can consume some oil. Around 0.1L per 10 hours is within spec for a well-used 3GM30F. Consumption that increases suddenly, or oil that comes out gray-white on the dipstick, requires immediate investigation. Keep a quart of the correct oil aboard. The correct oil — not whatever was on sale at the marine store.
End-of-Season Winterization Steps
Winterization done wrong is just deferred damage. Here’s the sequence that actually protects an engine through a hard winter — and yes, sequence matters.
Change Oil While the Engine Is Warm
Run the engine to operating temperature first. Warm oil drains fully and carries combustion acids and particulates out with it. Cold oil leaves a surprising amount of contaminated residue clinging to the pan walls — the last thing you want sitting against metal for five months. This step takes an extra 15 minutes and protects bearings that cost considerably more than 15 minutes.
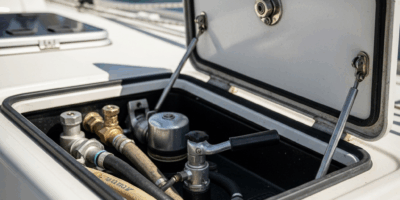
Drain the Raw Water Circuit
This step varies by engine — which is why you need the manual open in front of you, not a general description. On a Yanmar 3GM30F, there’s a drain petcock on the heat exchanger and a plug at the bottom of the exhaust manifold. Beta Marine engines typically have two drain points — one on the pump housing, one at the lowest point of the manifold. Volvo D1/D2 engines have drain points at the heat exchanger and thermostat housing. After draining, blow through the raw water inlet hose to verify the lines are actually clear. Then pull the impeller — running a dry impeller during spring startup, even briefly, destroys it. Which is a painful way to begin a season.
Fogging and Fuel Stabilization
Spray fogging oil — CRC 06070 or equivalent — into the intake while the engine runs briefly after the raw water circuit is drained. This coats the cylinder walls and prevents rust from forming over winter. For fuel, add Sta-Bil 360 Marine at 1oz per 2.5 gallons, then run the engine long enough to circulate treated fuel through the injection system. Fill the tank as full as practical — a full tank minimizes the condensation that causes next season’s fuel problems.
Protect Zincs and Seacocks
Install fresh zincs at haul-out. Operate every seacock through its full range of motion and coat the shaft with Lanocote or a similar waterproof grease. A seized seacock during an actual emergency is catastrophic. That’s not an exaggeration — that’s what “catastrophic” means in the context of a boat taking on water.
The Three Failures That Strand Sailboats
Frustrated by watching the same boats get towed in season after season, I started asking the mechanics at our boatyard what they actually saw most often. After eleven seasons and those conversations, the same three problems come up every time. Everything else is genuinely rarer.
Fuel Contamination — Water and Algae
Water in diesel comes from condensation in the tank over winter and from contaminated fuel at the dock. Algae — technically bacteria and fungi, but everyone calls it algae — blooms at the diesel/water interface and produces a black sludge that clogs filters within hours. Prevention is a 10-micron primary filter like the Racor 500MA, a full tank in storage, and annual biocide treatment with Biobor JF at 1oz per 64 gallons. If you already have black sludge in the bowl, the tank needs to be cleaned before a filter swap will do anything useful. Swapping filters on a contaminated tank is just an expensive way to keep doing the same thing.
Impeller Failure
Impeller rubber degrades with age and heat. Vanes break off and travel downstream into the heat exchanger, blocking flow — engine overheats, engine gets damaged. Prevention is annual replacement, or every two seasons for engines seeing fewer than 100 hours a year. When an impeller does fail, retrieve every vane fragment from the raw water circuit before restarting. Every fragment. This means disassembling the heat exchanger tubes if necessary. Leaving a vane in the circuit and restarting guarantees a blocked heat exchanger and a second overheat, which is a miserable way to learn the lesson twice.
Overheating From Blocked Raw Water Flow
Beyond impeller failure, raw water flow gets blocked by clogged strainers, failed thermostats, collapsed hoses, and debris at the seacock. Overheating above 200°F on a raw-water cooled engine — or above 185°F on a freshwater-cooled engine — means shut it down immediately. Keep a spare thermostat aboard. They run $15–$30 and failure after several seasons is not uncommon. That might be the best option for cheap insurance, as overheating requires an immediate response — because a few extra minutes at temperature can warp a head that costs several thousand dollars to replace.
DIY vs Mechanic — What to Handle Yourself
Probably should have opened with this too, honestly. I burned time and money early on paying a mechanic to do tasks I could have done in an afternoon with a $25 tool. Equally, I burned money trying to DIY things that needed a professional and made them worse in the process. Here’s the honest breakdown.
Confident DIY Territory
- Oil and filter changes — 45 minutes, basic tools, $40–$60 in materials
- Impeller replacement — 30 minutes, flathead screwdriver and pliers, $30–$45 in parts
- Primary and secondary fuel filter replacement — 20 minutes, $15–$30
- Belt inspection and replacement — 30 minutes, $15–$25 for a quality spare belt
- Zinc replacement — 15 minutes, $10–$30 per zinc
- Raw water strainer cleaning — 10 minutes, no cost
- Coolant drain and refill — 45 minutes, $20–$30 in coolant
Call a Marine Mechanic
- Injector testing and service — requires a pop tester and real expertise; injectors on a Yanmar 3GM30F run $180–$250 each, and incorrect installation makes everything worse
- Valve adjustment — requires a feeler gauge, a torque wrench, and precise knowledge of your engine’s specs; Yanmar 3GM intake clearance is 0.15mm, exhaust is 0.20mm — not a first attempt without supervision
- Engine alignment — requires a dial indicator and is critical after any engine mount replacement or major haulout; misalignment destroys the cutlass bearing and the shaft seal
- Head gasket replacement — once coolant is contaminated, the head needs to come off and be inspected by someone who can assess for warping
Cost Reality
A full spring commissioning done by a marina mechanic runs $350–$600 at most yards, depending on labor rates and parts. Doing the oil change, impeller, filters, and zincs yourself takes about two hours and $100–$150 in materials. Do that every year for ten years and you’ve kept $2,000–$4,500 in your pocket. That’s a lot of diesel — or a decent electronics upgrade, or a week of cruising you wouldn’t otherwise afford. Save the mechanic budget for injectors and valve adjustments that genuinely need trained hands.
The engine doesn’t care whether you find maintenance interesting. It cares whether it was done. Work through this list at the start of the season, keep up with the 50-hour checks mid-summer, and winterize properly in the fall. The sailors who never need a tow aren’t luckier — they’re just more consistent about doing the boring stuff before it becomes an exciting problem.


Stay in the loop
Get the latest sail the seas mag updates delivered to your inbox.