“`html
Why Cabin Soles Swell and How Water Gets In
Cabin sole swelling has gotten complicated with all the conflicting advice floating around online. As someone who spent three seasons cruising the Caribbean and eastern seaboard aboard a 1989 Catalina 36, I learned everything there is to know about what happens when water meets wood below deck. Today, I’ll share it all with you.
Most cabin soles are built from marine plywood with teak or mahogany veneer on top—good materials, supposedly. But what is marine plywood, really? In essence, it’s wood layers bonded together. But it’s much more than that. It’s basically a sponge wrapped in a plastic bag, and once water gets past the veneer, it migrates into the core like nobody’s business.
Here’s what happens next: wood fibers absorb moisture and swell perpendicular to the grain. You end up with soft spots, separations between planks, and eventually, rot that spreads faster than you’d think. I discovered a section under my forward cabin that had gone from solid to squishy in about eight months of normal coastal sailing. That was humbling.
Water finds its way into cabin soles through specific routes—and they’re more predictable than you’d expect:
- Deck leaks at the cabin trunk and companionway—Rain works its way down the exterior surfaces and seeps through cracks in caulking or around fasteners. This is the big one.
- Portlight gaskets failing—Even a slow weep from a portlight frame eventually reaches the sole underneath. Slow but relentless.
- Bilge moisture rising—Your bilge isn’t sealed at the bottom. Moisture vapor migrates up through the structure, especially in humid climates where the air itself feels heavy.
- Condensation accumulation—Without proper air circulation, moisture collects on cabin soles during cool nights or in tropical anchorages where you’re sweltering topside.
- Through-hull penetrations—Sea cocks, exhaust passes, and electrical conduits that run below deck create pathways for moisture to find your wood.
The galley area and head get hit hardest—they’re splash zones and humidity factories all at once. Berth soles, especially forward and aft cabins, suffer from condensation trapped between the hull and the flooring like water in a cup. The companionway sole is a high-traffic area collecting both rain drips and bilge moisture wicking upward.
Spot the Early Warning Signs Before Damage Spreads
You won’t need fancy moisture meters or expensive diagnostic equipment. Simple observation catches problems before they become wallet-destroying disasters.
Feel the sole with your thumb. Press hard in suspect areas. If it gives instead of resisting, water has already penetrated deeper than you want. I caught my first soft spot because I literally felt it squish slightly when I stepped on the galley sole near the sink drain—that small sensation probably saved me thousands in repairs.
Look for color changes. New teak doesn’t suddenly darken or go blotchy. Darker patches, lighter streaks, or fuzzy discoloration—that’s mold, and it means water is moving through the wood. Photograph these spots so you can track whether they’re expanding over weeks or months.
Smell matters more than people admit, honestly. A damp, musty odor—not bilge funk, but earthy and sour at the same time—signals moisture accumulation underneath. On my boat, the forward cabin had that smell months before I found the actual soft spot. I’m apparently the type to ignore subtle warning signs, and it cost me.
Check for movement. Walk your cabin sole intentionally. Does any section feel spongy or springy underfoot? Healthy plywood should be rock-solid. Any give is a warning—don’t dismiss it. Listen too. Creaking that changes character sometimes indicates delamination beginning, which is when things get serious.
Inspect seams between sole planks with real attention. Separations wider than 1/8 inch mean the wood underneath is swelling and pushing planks apart. This is a critical indicator that your window to prevent major damage is closing fast.
Do this check every three months if you cruise year-round. Probably should have opened with this section, honestly—most sailors don’t touch their cabin sole until something obvious breaks and they’re staring at a bill for $5,000+.
Stop Water Intrusion at the Source
Prevention costs nearly nothing compared to replacement work. Start with the highest-impact fixes first and work your way down the priority list.
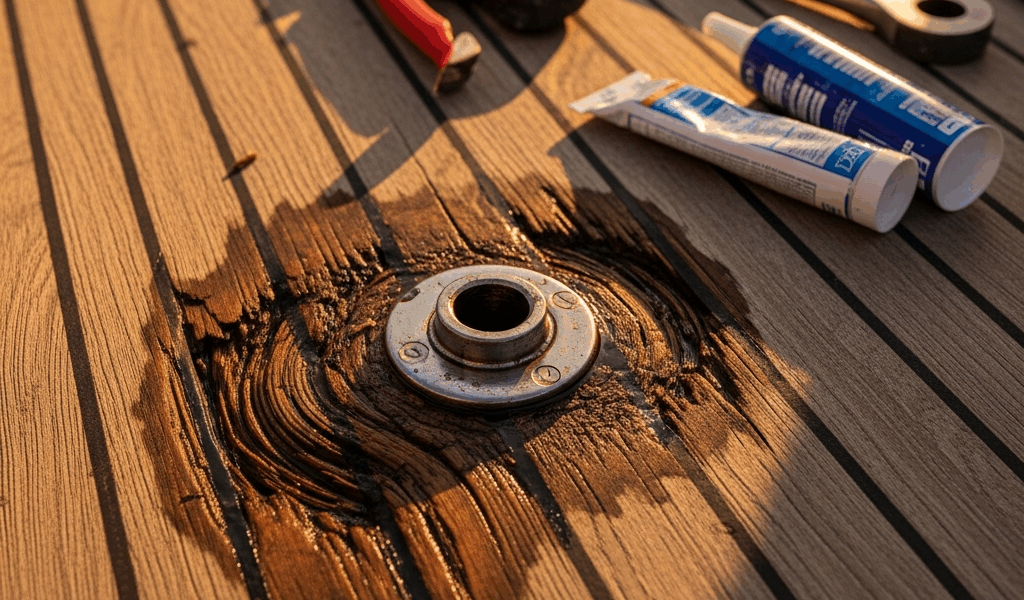
Seal Deck Penetrations and Cabin Trunk Seams
Every fastener and seam on your cabin trunk is a potential leak point—at least if you want to keep water out of your boat. Walk your deck after rain and check the cabin sole directly below. If it’s damp, water is coming through right there.
Use a marine caulking gun with Sikaflex 291 or equivalent polyurethane sealant. You’re not rebuilding anything—just refreshing seals that have cracked from UV and movement. Cost: about $15-20 per tube, and one tube covers most cabin trunks. Yes, it’s tedious work on a Saturday afternoon, but it stops 40-50% of water entry problems on most boats.
Replace Portlight Gaskets Proactively
Portlight seals degrade every five to seven years. Don’t wait until they leak—that’s reactive maintenance, and it always costs more. A rubdown with a rubber eraser can temporarily restore grip, but real prevention means new gaskets. Beckson, Lewmar, and Bomar all offer replacement gaskets for standard ports in the $25-60 range per port. Do this every five years as routine maintenance, and you eliminate a major moisture pathway before it becomes a problem.
Manage Bilge Moisture Aggressively
Your bilge is a moisture factory. Seawater splash, fresh water from rain, and condensation all pool down there waiting to wick upward into your soles. Pump it out every three to five days during active cruising. Use a hand pump if your electric pump fails—I learned this the hard way when my Rule 1100 died mid-passage and I spent a day pumping manually, which was not fun.
Place desiccant containers below the cabin sole, not just in the cabin itself. A €3 tub of silica gel granules lasts two weeks in humid climates—no exaggeration. Replace monthly and watch humidity levels drop noticeably. This specifically targets the moisture layer right at the sole level where it causes the most damage.
Improve Ventilation Below Decks
Air movement prevents moisture accumulation like nothing else can. Install through-cabin ventilation by opening opposite-side ports and hatches simultaneously. If you’re at anchor in a hot climate, rig a wind scoop in the forward hatch to push air down and out the aft cabins. This alone drops humidity 15-25% in my experience—seriously measurable improvement.
Check and Seal Hatch Seams
Cabin hatches leak silently. Inspect the gasket material on every hatch quarterly. If it’s hardened or cracked, water bypasses the seal during rain like the gasket doesn’t exist. Replacement gaskets run $10-30 per hatch and take maybe 30 minutes to swap out.
Repair a Swollen Sole Without Replacing It
If you’ve caught swelling early, you don’t need to replace the entire cabin sole. That’s a 200+ hour project requiring removal of all cabinetry—total nightmare scenario.
For isolated soft spots no larger than 12 inches across, here’s what you do: Use a rotary tool to cut out the damaged section in a rectangular shape. Dry it completely with a heat gun—this part is critical and takes patience. Cut a patch from teak or mahogany plywood, fit it snugly, and glue it down with epoxy-resorcinol adhesive like Unibond 800. Sand smooth and seal with two coats of marine varnish or epoxy topcoat.
Cost: $50-100 in materials. Time: two weekends if you’re working slowly. I did this twice on my boat with success lasting over three years before I eventually sold her to someone else.
For larger swollen areas affecting multiple planks, remove the damaged planks only. This requires careful extraction to avoid damage to surrounding structure. Replace them with new marine plywood, cut to exact dimensions, and seal everything with two-part epoxy sealer before reassembly. More involved work, but still far cheaper than a full sole rebuild. Budget $300-600 and a week of work for a 4-by-8-foot section.
Seal all repaired areas with epoxy or polyurethane topcoat. Don’t make my mistake and skip this step. The goal is making the repair zone waterproof so future moisture has nowhere to enter and cause the same problem again.
Long-Passage Prevention—How to Protect Your Cabin on Blue Water
Extended cruising creates specific moisture challenges that feel different from coastal sailing. You’re out for months at a time, sometimes in tropical climates where humidity becomes the boat’s new normal and your baseline for comfort.
Increase ventilation underway intentionally. Open cabin vents when conditions allow—not just hatches, but dedicated ventilation ports. A $40 Dorade box on a cabin hatch lets you maintain airflow even during light rain. This continuous circulation prevents moisture from ever accumulating beneath the sole in the first place.
In tropical anchorages, run continuous air movement. A 12-volt cabin fan ($30-50) can reduce humidity dramatically when positioned to move air across the sole and out through opposing vents. This is especially critical in the doldrums where you’re anchored for weeks and the air feels thick enough to cut with a knife.
Pump your bilge every single day. This isn’t optional for bluewater cruisers—it’s non-negotiable. Make it part of your morning routine, like coffee or checking the weather forecast. A few minutes of hand-pumping eliminates the moisture layer that would otherwise wick upward into your soles like a sponge.
Inspect bilges weekly for seawater contamination. Bilge water should be fresh or nearly fresh. If it’s salty, you have a hull leak or poor drainage design concentrating moisture below deck. Address this before it spreads to your cabin soles and ruins your day.
Apply protective coatings to bare plywood edges where you’ve made repairs or cuts. Two-part epoxy sealer creates a moisture barrier that slows absorption significantly. Reapply every two years as part of your maintenance schedule.
Track humidity with a basic hygrometer—they cost $8-15 at any marine supply store. Anything above 70% for extended periods signals the need for aggressive dehumidification. Simple desiccant canisters work fine for passive control during calm periods, but extended bluewater passages in tropical zones might require active solutions like a small dehumidifier powered by your solar panels.
Your cabin sole is part of your boat’s structural integrity. Protect it now, and you’ll cruise for decades without major systems failures catching you off guard.
“`


Stay in the loop
Get the latest sail the seas mag updates delivered to your inbox.