Why Your Holding Tank System Stops Pumping Out
Holding tank problems have gotten complicated with all the bad advice flying around — forums full of people suggesting you replace everything when usually it’s one small thing that’s failed. Let me cut through that.
As someone who spent three days anchored off Staniel Cay in the Exumas staring at a dead pump switch, I learned everything there is to know about marine sanitation failures. Today, I will share it all with you.
That particular trip was 2019. Water temperature was 84 degrees, the smell inside the head was getting worse by the hour, and I had a week left on my charter. Not ideal. What I eventually found was a $34 impeller that had crumbled into four pieces inside a Jabsco macerator pump. Four pieces. The whole system — tank, hose, vent, wiring — was completely fine. One rubber component the size of a walnut had shut everything down.
But what is a holding tank system? In essence, it’s a closed waste loop — waste enters the tank, a pump moves it out when you activate the switch, and a vent line keeps pressure equalized so fluid actually moves. But it’s much more than that. It’s also the thing that determines whether your boat smells like a boat or like a port-a-potty in July. That’s what makes a functioning sanitation system endearing to us cruisers. So, without further ado, let’s dive in.
Three things cause almost every failure: the pump has seized or lost power, the hose has calcified shut from years of urine salt buildup, or the vent line is blocked and vacuum-locking the whole system. Occasionally a faulty float sensor sends a false “full” signal. That’s real but less common than the first three. Work through this in order and you’ll either fix it at anchor or know exactly what needs replacing when you get back to the dock.
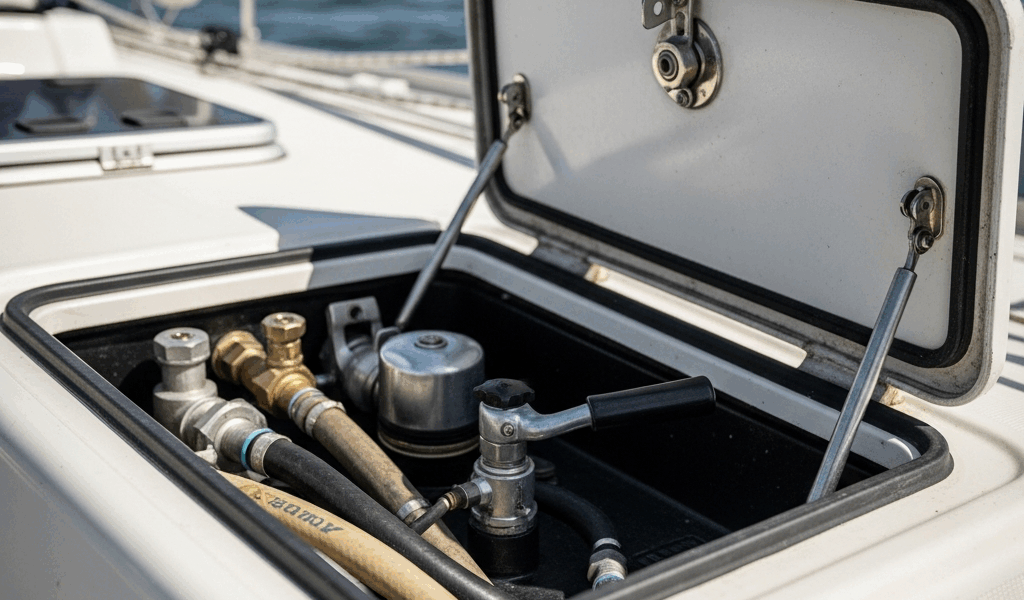
Step 1 — Check the Pump and Power First
Start here. It’s the fastest diagnosis by a significant margin — sometimes under ten minutes.
You’re looking for three things: 12-volt power actually reaching the pump terminals, audible evidence the motor is spinning, and real discharge happening when you activate the switch. If any one of those three is missing, you’ve found your problem.
Locate the pump first. On most coastal cruisers and bluewater boats it’s mounted low — under a berth, inside an aft cabin locker, or tucked against the bilge framing. You’ll see two wires going in and two hoses. Grab a basic 12V test light — Klein makes a good one for around $18 at any West Marine — or use a multimeter if you already have one aboard. Touch the positive probe to the battery-side terminal, ground to the bonding system, then activate the head. Light comes on? Power is reaching the switch. No light? Check your battery isolation panel and the circuit breaker labeled for the head circuit before touching anything else.
Assuming power checks out, just listen. A working pump motor makes a distinct whirring sound — higher pitched when it’s moving fluid, slightly labored when pushing against resistance, noticeably different when running dry. A seized impeller or stuck rotor makes almost nothing. Maybe a faint click. Maybe silence.
Pump hums but nothing comes out? Impeller is worn or the blockage is downstream. No hum at all with power confirmed? Motor has seized. That second scenario is actually the easier fix.
Jabsco, Whale, and Rule make the majority of marine sanitation pumps you’ll encounter. All three use replaceable rubber impellers — a small star-shaped piece inside the pump body. Replacement kits run $25 to $60 depending on model. Buy the kit specific to your pump number, not a generic. Pull the pump off its mount — usually four bolts, M6 or 5/16 — unscrew the pump head, and look at the impeller. Cracked, crumbly, missing fins, or compressed flat: that’s your culprit. Swap it, bleed air by running the pump briefly into a bucket, then retest with the full tank.
Probably should have opened with this section, honestly. I’ve watched experienced sailors spend two hours tracing wiring before somebody finally opened the pump housing and found a destroyed impeller sitting right there. Don’t make my mistake.
Step 2 — Diagnose a Blocked or Calcified Hose
Urine salt deposits build up inside sanitation hose the way mineral scale builds up inside a kettle. Slowly. Then suddenly you have a hose with the interior diameter of a drinking straw.
Feel along the hose running from the tank to the pump outlet. If it’s clear hose — the translucent kind — you can actually see the calcium deposits, white or tan crystals coating the inside walls. Opaque hose requires a different approach: flex it gently along its full length. A calcified section feels rigid, almost bone-like, compared to the pliable sections around it. The smell intensifies near the blockage too. That’s not a pleasant diagnostic method but it works.
Once you’ve located the suspect section, disconnect at the pump-side fitting. Use two wrenches — one holding the fitting body, one turning the nut — or you’ll crack the plastic nipple and turn a hose problem into a fitting problem. Some seawater will drain. Normal. Try blowing compressed air through from the tank end. Solid resistance or zero airflow confirms a blockage.
Two options from here. Soak the affected hose section in white vinegar — grocery store stuff, the $3 gallon jug — overnight. This dissolves light to moderate calcium buildup roughly 70 percent of the time. Heavy deposits laugh at vinegar. For those, replacement is faster and frankly more reliable than hoping the vinegar works.
Trident Series 101 is probably the best option for replacement hose, as the sanitation application requires genuine odor-barrier construction. That is because standard reinforced hose — even marine-grade — allows permeation that standard sanitation hose doesn’t. It runs about $3.25 per foot and lasts considerably longer than budget alternatives. Cut a fresh section, reinstall with stainless marine-rated clamps, and leave a little slack at each end so vibration doesn’t stress the fittings.
Step 3 — Check the Vent Line and Deck Fitting
A blocked vent is sneaky. The pump motor sounds completely healthy. The hose is clear. Nothing comes out anyway — because the system is vacuum-locked and the pump is essentially trying to pull fluid through a sealed container.
Find your tank vent. It runs from the top of the tank up to a deck fitting or through-hull, typically 3/4 inch diameter, positioned ideally well above the waterline. That last part matters — I’m apparently prone to ignoring this detail and boats with low vent fittings near the rail get water intrusion during upwind passages, and that works against you when the fitting is consistently submerging at 20 degrees of heel.
Inspect the deck fitting itself first. Salt crust, accumulated debris, old tape from a previous owner who “temporarily” blocked it — all common. Probe it with a thin stainless wire or a straightened coat hanger. Push gently from the deck end down into the hose. Resistance where there shouldn’t be any confirms a blockage. Lung power through a piece of tubing clears light obstructions. A small hand pump works for anything more stubborn. Skip the high-pressure air compressor — tank ruptures are real and expensive.
Clear the vent and the pump usually works immediately. That fast resolution is either satisfying or slightly annoying depending on how long you spent on the previous two steps.
When to Call It and Replace the System
Field repairs have limits. A cracked tank is replacement territory — full stop. Hose that crumbles when you flex it has degraded past the point where any repair holds reliably. A through-hull fitting so corroded it won’t seat properly is a haul-out conversation, not an anchorage fix.
While you won’t need a full marine electrician for most of these repairs, you will need a handful of basic tools and the right spare parts aboard before you leave the dock. A test light, two adjustable wrenches, a spare impeller kit for your specific pump model, and about 10 feet of coiled Trident 101 in a zip bag under a berth. Total outlay somewhere around $85 to $110. That kit has saved me from genuine vacation-ending situations twice now.
One more thing. No-discharge zones cover most of the cruising grounds worth visiting — the Bahamas, the ICW, most of the Great Lakes, coastal Florida. Bypassing a broken system isn’t a workaround. It’s a fine waiting to happen and a real environmental problem in shallow-water anchorages. Fix it properly.
First, you should pump the tank completely empty before any passage — at least if you want to avoid diagnosing this problem offshore in a seaway instead of at a calm anchorage. Then check vent line clearance. Then verify pump function with a test cycle. Five minutes at the dock. Genuinely beats an hour of troubleshooting at sea with chop running.


Stay in the loop
Get the latest sail the seas mag updates delivered to your inbox.