Signs Your Rigging Wire Is Corroding Too Fast
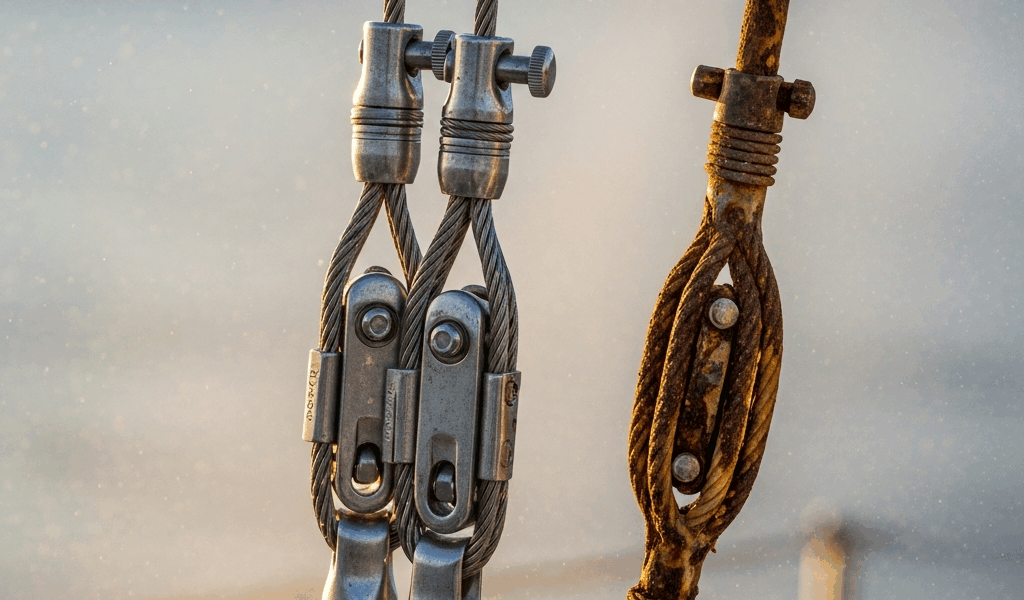
I spent three months anchored in the Caribbean watching my upper shroud turn from lustrous stainless to something that looked like it belonged in a junkyard. The first warning sign? A fine white powder coating the wire near the spreader fitting.
This white residue is oxidation — the early stage of what sailors call “tea staining” or corrosion bloom. It looks harmless until you understand what’s happening at the microscopic level. The stainless steel is losing its protective chromium oxide layer. Left unchecked, this progresses in ways that can seriously compromise your rig.
Here’s what to look for during your next inspection:
- White or gray powdery deposits clustered around terminals, turnbuckles, and spreader attach points
- Pitting visible under magnification — tiny crater-like holes in the wire surface that catch light differently than surrounding metal
- Measurable diameter loss — use calipers on suspect sections and compare to specifications (a 3/16-inch wire should measure within 0.004 inches of nominal)
- Unraveling outer strands at terminal ends, where corrosion has eaten through the outer layer
- Dark staining or rust streaks running down the spar beneath the wire attachment point
The honest mistake I made was ignoring stage-one corrosion for five weeks. I thought it was cosmetic. By the time I noticed actual pitting under my magnifying glass, two strands were compromised. Probably should have opened with the inspection checklist, honestly.
Why Stainless Steel Rigging Still Rusts at Sea
This confused me for years. The whole point of stainless steel is that it doesn’t rust, right? That’s the marketing line, anyway. The reality is messier — and it’s worth understanding if you want to keep your rig intact.
Stainless steel prevents rust through a self-healing chromium oxide film — microscopically thin, about 1-3 nanometers. In the ocean, three simultaneous attacks destroy this film faster than it can regenerate. First: chloride ions from salt spray penetrate any microscopic defect and trigger crevice corrosion. Second: dissimilar metals create galvanic couples. Your 316 stainless shroud connected to a bronze turnbuckle or zinc-plated U-bolt? You’ve got a battery running 24/7. The stainless becomes the cathode and accelerates the corrosion of the fitting, but also suffers localized attack at the contact point.
Third attack is oxygen depletion. Wire bundled tightly at a spreader boot traps moisture and depletes oxygen beneath the fitting. Stainless steel corrodes faster in low-oxygen saltwater than in high-oxygen conditions. This is the crevice-corrosion mechanism that catches most cruising sailors off guard.
Not all stainless is equal. Grade 304 (the cheap commodity stuff) contains about 8-10% nickel and 18% chromium. Grade 316 adds 2-3% molybdenum, which dramatically improves resistance to pitting in chloride-rich environments. If you’re buying replacement wire, 316 costs roughly 15-20% more than 304 but survives offshore passages measurably longer. I replaced half my shrouds with 316 during a refit in Grenada and upgraded the rest before crossing the Pacific. The 304 wire I pulled showed significant pitting after four seasons in the Caribbean. The 316 sections were still lustrous.
The wire itself is often the stronger link in this chain. The terminals — swages, pelican hooks, or turnbuckles — fail first because they trap crevices worse than bare wire.
Four Prevention Steps You Can Do Underway
You won’t need to haul out to meaningfully extend rigging life. I’ve kept wire in serviceable condition for 2,000+ miles between major haul-outs using these four techniques, executed during normal cruising.
Step One: Rinse with Fresh Water
The most effective prevention is the simplest. After days in saltwater spray — especially post-passage, post-storm, or post-hard-sailing — rinse all rigging with fresh water from deck. This removes salt deposits and breaks the wet-salt-residue cycle that drives corrosion.
Frequency matters. If you’re anchored in a calm bay for three weeks, rinse weekly. If you’re sailing through heavy spray daily, rinse every other day during passage or immediately after. Use a regular deck-wash hose. You don’t need high pressure; low flow is safer (high pressure drives salt into terminal crevices). A soft brush around spreader boots and terminals helps, but no wire brushes — those can create micro-scratches that initiate corrosion.
Step Two: Apply Protective Coating Strategically
This is timing-dependent. Never apply spray coatings while at sea or in strong wind; salt-laden air will contaminate the finish. Only apply during calm anchorages with low humidity forecast.
A thin film of marine grease (Tef-Gel or similar) applied to terminals and spreader connections creates a barrier against fresh salt spray. Light machine oil works, though it washes off faster than thicker compounds. I’ve had mixed results with spray-on corrosion inhibitors like Boeshield T-9 — they work in theory, but repeated salt rinses wear them away faster than greasing, and they’re hard to reapply underway.
Step Three: Inspect Terminals Every Season
Wire terminals are your weak point. Swages can develop micro-cracks from flexing. Pelican hooks and turnbuckles trap water in crevices. Every 3-4 months (or when you notice white deposits), inspect each terminal with 10x magnification. Look for corrosion creeping up from the fitting into the wire itself. Early-stage pitting is reversible if you catch it and remove the wire from service.
Turnbuckles allow mid-life adjustment, so they’re worth detailed inspection. Unscrew the barrel slightly to let air circulate, then reseat it. Check that no crevice water sits between the barrel and the lock nuts.
Step Four: Lubricate Where Salt Collects
High-mast fittings — spreader boots, attachment brackets, cap shroud tangs — are salt traps. Every two months, apply a light coat of protective compound to the metal-to-metal interface. You’re not lubricating for motion; you’re displacing salt water and creating a barrier. A grease-filled syringe works well for spreader boots. For tangs and fittings, a rag and mineral oil is sufficient.
This step requires the rig to be stable. Never do this in any kind of seaway. Calm anchorages, pre-dawn, light conditions.
Seasonal Rigging Maintenance Schedule for Cruisers
I plan rigging work around predictable sailing patterns and weather windows. This timeline assumes cruising in tropical or subtropical latitudes; cold-water sailors should accelerate everything by 2-3 weeks.
Post-Passage Inspection (Every Arrival)
Within 24 hours of anchorage, after any passage longer than three days, conduct a visual walk-around. Rinse all rigging with fresh water. Check terminals for white deposits. Photograph any corrosion spots for your maintenance log. This takes 30 minutes and catches 80% of problems early.
Pre-Hurricane/Cyclone Season Check (4-6 Weeks Before)
If you’re anchored in a storm-risk zone, perform a detailed inspection 4-6 weeks before the local active season. Measure critical wires (upper shrouds, cap shrouds, lowers). If any reading is below 80% of nominal diameter, mark for replacement before heavy weather arrives. This is not the time to discover marginal rigging.
Service all terminals. Tighten turnbuckle lock nuts. Grease spreader boots and fittings. If you’re planning to sit out a season in the tropics (June-November in the Atlantic/Caribbean), this is your window.
Winter Haul-Out Protocol (If Applicable)
If you’re hauling for extended storage or cold-season maintenance, this is your chance to address rigging seriously. Pull any wire showing stage-2 corrosion (visible pitting, measurable diameter loss). Replace swaged terminals that trap crevices; consider upgrading to toggles with better drainage. This is when a rigger’s inspection becomes valuable — they can identify subtle wire fatigue invisible to untrained eyes.
I budgeted $1,200-1,800 per shroud for replacement with new 316 stainless terminals during my last haul-out. Steep, yes, but cheaper than rig failure at sea.
Tropics-Specific Accelerated Schedule
If you’re year-round in the Caribbean, Pacific islands, or other high-humidity/salt-spray zones, compress the timeline. Rinse weekly even at anchor. Inspect terminals monthly. Lubricate spreader boots and fittings every 6 weeks instead of every 8-10 weeks. Corrosion happens faster in the tropics — I’ve seen stage-3 degradation in 18 months that would take 3 years in temperate waters.
When to Replace vs When to Preserve Existing Wire
Rigging replacement is expensive. A full cap-shroud and upper-shroud set replacement on a 40-foot cruising sailboat runs $2,500-4,000 with professional installation. So the question becomes: when is preservation worth the effort, and when are you just delaying the inevitable?
Measurement Thresholds
If a wire measures within 95% of nominal diameter and shows only white oxidation (no pitting), it’s preserved. Rinse, lubricate, and plan replacement within 2-3 years.
If it measures 90-95% of nominal and shows stage-1 pitting (pinhole-sized), it’s marginal. You can extend life 1-2 years with aggressive prevention, but this is now in “risky” territory for offshore passages.
Below 90% nominal diameter, replace it. Wire loses strength exponentially as it thins. A shroud at 85% nominal has lost roughly 20% of its load capacity. That’s not acceptable on a bluewater boat.
Terminal-Failure Risk Zones
Measure the wire immediately below the terminal fitting, at the 1-inch point where corrosion is most aggressive. If this section measures 85-90% nominal but the wire bulk measures 95%, the problem is localized crevice corrosion. You can preserve this by replacing just the terminal, re-swaging new fittings onto the existing wire. This costs $150-300 per terminal, versus $800-1,200 for full-wire replacement. I’ve done this three times and it’s worked well.
Life-Extension Techniques for Marginal Wire
Bluewater sailors running tight budgets sometimes preserve marginal wire using layering strategies. Add a parallel junior stay (lightweight wire running parallel to the primary shroud) that shares load. This reduces stress on the primary wire and can extend life 2-3 years. It’s a Band-Aid, not a solution, but it works for the season you need it to.
Another approach: remove the wire from active service but keep it installed as insurance backup. Rig a new shroud alongside the old one, load-sharing. If the old wire fails, the backup holds. This costs more upfront but removes the risk gamble from daily sailing.
The honest calculation: if you’re cruising on a tight budget and your wire hits the marginal zone, plan replacement for your next haul-out window. Don’t preserve indefinitely. Rigging failure at sea — especially cap shrouds or forward lowers — can dismast the boat.


Stay in the loop
Get the latest sail the seas mag updates delivered to your inbox.