“`html
Why Sailboat Engines Overheat Underway
Sailboat engine overheating while motoring has gotten complicated with all the mechanical variables flying around — maybe you’re motorsailing into a harbor, bucking a headwind, or nursing a weak breeze on passage. I learned this the hard way at mile 47 off the Exuma Cays when my Yanmar’s temperature gauge climbed past 180°F in about four minutes flat. The problem isn’t some mysterious electrical gremlin. It’s far simpler and, thankfully, almost always fixable from the helm.
But what is a marine cooling system, really? In essence, it’s raw seawater pulled directly from outside your hull through a through-hull fitting. That water flows through a strainer, then a heat exchanger, and back out through another hull fitting. But it’s much more than that — it’s efficient, it’s been the standard for decades, and it works brilliantly. Until it doesn’t.
Here’s where things fall apart: seawater doesn’t stay clean. Kelp wraps around intake seacocks. Sediment clogs the strainer. Barnacles grow on the through-hull. Biological slime — I call it sea snot, and yes, it’s real — fouls the impeller. Unlike car engines with controlled cooling loops, you’re pulling whatever the ocean throws at you. At anchor in a tropical anchorage, that might be kelp, eelgrass, or floating Sargasso. In a temperate estuary, it could be silt and sediment. Impeller wear accumulates over months of use no matter where you are.
Most sailors don’t diagnose overheating until the alarm sounds. Here’s the workflow I now follow: shut down immediately, confirm the raw water discharge (the small hose exiting above the waterline) isn’t flowing, then work through the intake system methodically. Probably should have opened with this section, honestly — because panic is your real enemy when the engine temp climbs.
Check Your Raw Water Strainer First
Your raw water strainer is the first line of defense against debris. It’s a cylindrical bowl — usually bronze or plastic — mounted below deck near the galley or engine room. Mine is a Groco ARG-2000, mounted on a bracket just forward of the nav station. Access matters. If you can’t get to it safely while underway, that’s your first problem to solve.
Here’s the safe shutdown sequence: throttle to idle, switch off the engine, let it cool for 90 seconds. Position a bucket or bilge pump hose underneath the strainer. The bowl pressurizes when the engine runs. Crack that lid without depressurization and seawater will spray across your cabin sole — I’ve made that mistake once. Never again.
Most strainer bowls have a vent screw at the top, a small brass fitting opposite the drain plug. Open this first, gently. You should hear a soft hiss as pressure releases. Now you can safely open the main bowl. Turn it counterclockwise. A quarter-turn usually breaks the seal.
Once open, inspect the mesh screen and bowl interior. You’re looking for:
- Kelp or stringy seaweed wrapped around the mesh or wadded inside
- Sediment buildup on the bottom — anything from fine silt to coarse sand
- Slime or greenish biological coating on the screen itself
- Small pebbles or shells (yes, I’ve found those)
If the strainer bowl is visibly clogged, you’ve found your culprit. Clean the mesh screen by rinsing it from the inside outward with fresh water from your tanks. Don’t use a brush initially — let water pressure do the work. If debris persists, a soft brush works, but be gentle. Damaged mesh means water bypasses the filter entirely.
Empty the bowl, rinse it, replace any o-ring if it looks compressed or damaged — I carry spare kits for both my Groco and my backup strainer — and reassemble. The whole process takes five minutes. Restart the engine and check the raw water discharge hose again. You should see a steady stream from the through-hull fitting mounted on the transom or cockpit coaming.
A strong discharge stream, not just a dribble, tells you water is flowing. Weak flow even after cleaning means the blockage is downstream in the through-hull valve itself.
Inspect the Through-Hull Intake Valve
Your through-hull seacock controls water flow into the cooling system. It’s usually a bronze ball valve with a lever handle. Quarter-turn means closed. Parallel to the hose means open. Perpendicular to the hose means closed. Sounds simple. But corrosion and mineral buildup can jam these valves partially shut, and that’s when cooling output drops below what your engine needs.
Visually inspect the seacock lever. Does it move freely? Try rotating it gently by hand. If there’s resistance, don’t force it — that’s how you break the valve’s internal ball. The valve is likely corroded from the inside. Gentle wiggling, literally quarter-inch oscillations, sometimes dislodges mineral deposits. If that fails and the valve won’t open fully, you’ve found a maintenance task for the next haul-out.
Look at the through-hull fitting itself. Is the outside surface covered in white or green corrosion? That’s galvanic corrosion, and it matters. When saltwater sits against dissimilar metals, electrons flow from the less noble metal like zinc to the more noble one like the copper in bronze. The zinc erodes. If the through-hull is severely corroded, pinhole leaks are possible, though rare. More commonly, corrosion inside the valve restricts flow.
If the seacock is fully open but raw water discharge is still weak, your intake is blocked underwater. Options: haul the boat and scrape barnacles from the through-hull fitting (the most common fix), or attempt flushing the blockage from inside using a garden hose inserted backward through the through-hull (a temporary measure that works sometimes). In shallow water at anchor, you might even dive and clear the fitting yourself, though in blue water that’s not practical.
For now, if the seacock is open and the strainer is clean, move to the impeller.
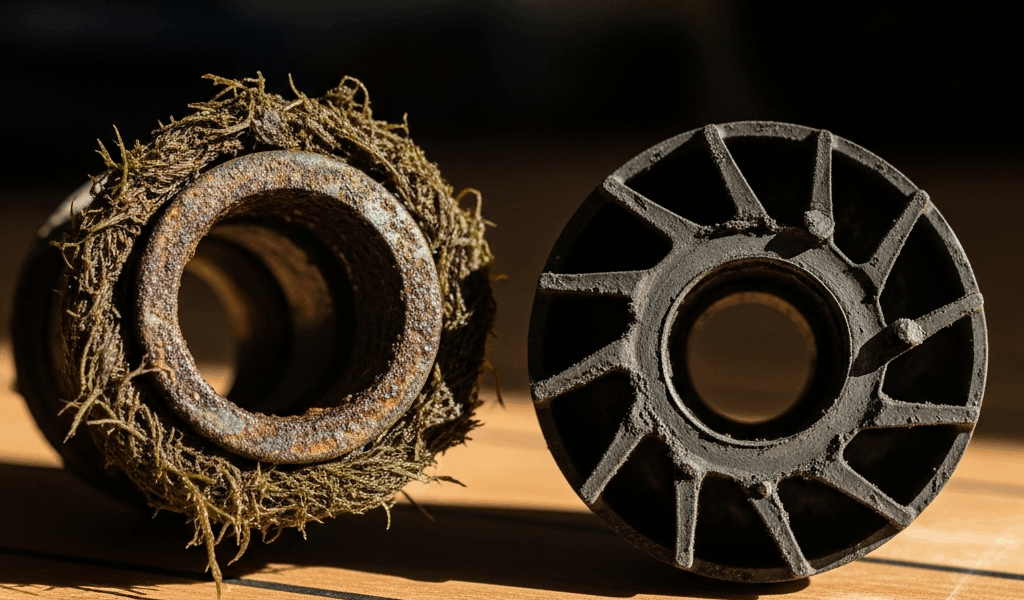
Test the Impeller and Cooling Circuit
The impeller is a rubber-bladed rotor inside your raw water pump. It spins, pushing seawater through the cooling circuit. Rubber impellers wear. Each hour of engine run time, the blades flex, compress, and slowly lose their elasticity and profile. After 400–600 hours, most impellers are compromised. Mine was a Sherwood G-series when I last checked, but whatever brand your engine uses, the wear pattern is identical.
How to recognize impeller wear: check the raw water strainer bowl again. This time look for tiny metal particles or rubber flecks. Fine sediment mixed with rubber bits is a red flag. Also watch for weak or inconsistent discharge flow from the through-hull even after cleaning the strainer. The pump is turning, but it’s not moving water efficiently.
Accessing the impeller requires opening the raw water pump housing. On my Yanmar 3GM30F, it’s four bolts on the pump’s face cover. I drain the cooling circuit first using the petcock below the heat exchanger. Then I unbolt, remove the cover, and inspect the impeller’s blade tips. Fresh impellers have sharp edges and firm rubber. Worn ones are soft, rounded, and sometimes visibly cracked.
Replacing an impeller is straightforward: pop out the old one — they often slide into a key slot — order the replacement from your engine dealer (roughly $30–$60 depending on brand), and install the new one with the key properly seated. The whole job takes 20 minutes. Critical warning: never run the pump dry. Rubber impellers need water lubrication. Running a pump without coolant flow burns them out in seconds.
After impeller replacement, refill the cooling circuit and bleed air from the system, usually through a vent screw on the thermostat housing. Test at idle. Temperature should stabilize within 10 minutes.
Prevent Overheating Before You Cast Off
Bluewater sailors can’t radio a diesel mechanic at mile 50. Prevention matters more than any emergency fix.
Every two to three months, inspect the sacrificial zinc in your heat exchanger. This small zinc bar erodes instead of the copper fins, protecting them from corrosion. When it’s half-gone, replace it. Zinc replacement kits for most marine engines cost $15–$40 and take ten minutes to install.
Before each season, flush the raw water strainer with fresh water from your tanks while the engine is off. Open the vent, crack the main bowl, let gravity do the work, and let the debris drain. This removes salt crystallization that accumulates during storage.
Test thermostat operation. The engine should reach normal operating temperature — usually 160–180°F for most marine diesels — and then stabilize. If it overshoots 200°F, the thermostat may be stuck open or the temperature sensor is faulty. A thermostat replacement is a $50 part and worth doing during winter lay-up.
Inspect all cooling hoses annually for splits, soft spots, or bulges. A hose failure mid-passage means seawater floods into the cabin. I replace all cooling hoses every four to five years regardless of appearance, because rubber degrades internally even when it looks fine externally.
Keep spare impellers on board. One for your engine’s pump, and one for your backup pump if you have a generator. Cost is minimal. Utility is enormous if you’re three days offshore and the original fails.
When you see that temperature gauge climb, shut down calmly. Check the strainer, confirm the seacock is open, and verify raw water discharge. Nine times out of ten, it’s one of those three things. Knowing where to look takes the panic out of the moment — and keeps your engine, and your passage, intact.
“`


Stay in the loop
Get the latest sail the seas mag updates delivered to your inbox.