Why Seacock Valves Freeze Up at Sea
A stuck sailboat seacock valve is one of those problems that hits you hardest when you’re anchored fifty miles from port. I learned this the unpleasant way during a three-week passage when my engine cooling intake seized mid-afternoon — I was staring at either overheating the raw water circuit or abandoning engine power entirely.
Seacocks freeze for three main reasons. First is galvanic corrosion. The electrochemical reaction between dissimilar metals — your bronze valve, brass fitting, and steel fasteners sitting in saltwater — creates invisible chemical damage that pits and binds the valve stem. Second is salt crystallization. When seawater evaporates inside the valve cavity through micro-leaks and thermal cycling, salt deposits accumulate like concrete. Third is zinc rod failure. When your sacrificial zinc anode corrodes away faster than it should, usually because it’s undersized or poorly installed, the surrounding bronze gets attacked directly.
There’s a practical distinction worth understanding: valves stuck in the open position versus stuck closed. An open valve that won’t shut is less immediately dangerous but more insidious — you risk sinking if your through-hull fitting ever gets damaged. A closed valve that won’t open? That’s an instant problem. You lose engine cooling or can’t access your water systems. Both need fixing, but the approach differs slightly.
Initial Assessment Before You Force Anything
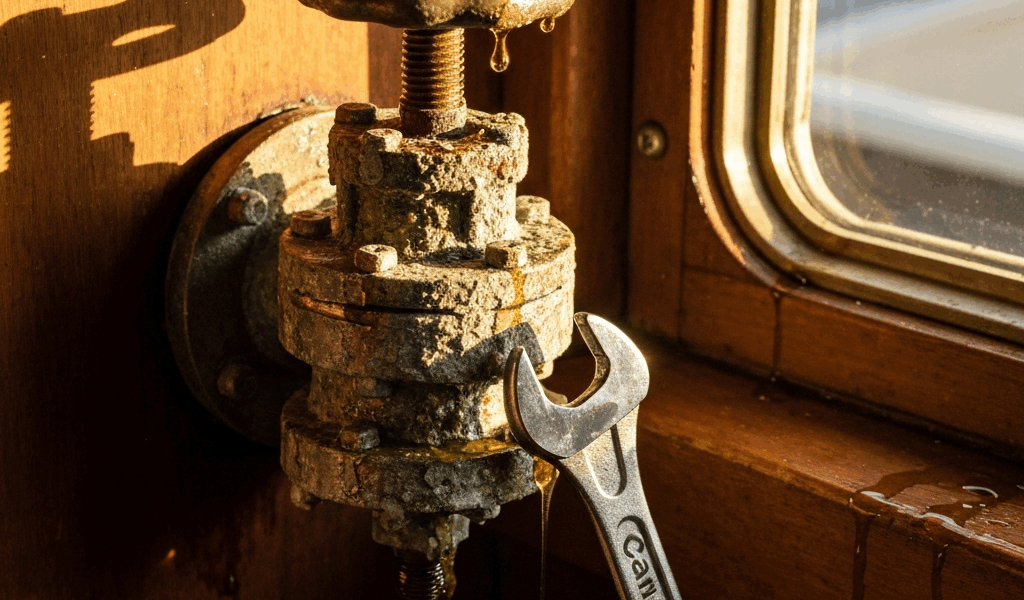
Stop. Don’t reach for a wrench yet. Probably should have opened with this section, honestly.
First, kill all system pressure. If this is your engine cooling intake, shut down the engine and let it cool for 15 minutes. If it’s a head or galley valve, turn off any pumps. Open a downstream vent or relief valve to release internal pressure — otherwise, forcing the seacock open can create a dangerous spray or push salt water up into components that absolutely don’t tolerate it.
Next, listen and feel. Turn the valve handle slowly with moderate hand pressure. Does it move slightly, then catch? That’s binding — usually fixable. Does it move freely but feels gritty inside? That suggests internal corrosion but not necessarily a seized stem. Does it not move at all with two-handed force? That’s a true seizure, and you’re going to need patience.
Here’s the critical warning: forcing a stuck seacock without preparation can strip the stem, rendering it worthless. A stripped stem means the valve won’t hold position even if you get it moving — the handle spins freely but the internal plug stays put. You’ll be replacing the entire valve under way, which is far worse than working through this methodically now.
Check your valve type. Through-hull seacocks typically come in two designs: gate valves with a sliding wedge that closes the flow, and ball valves where a rotating ball with a hole controls flow. Ball valves are less prone to seizing because the spherical design creates less surface area for corrosion to grip. Gate valves are more susceptible but still repairable. Look for the valve model number stamped on the body — knowing whether you’re dealing with a bronze Groco HF, a Forespar Seacock, or a standard bronze casting helps you understand its design limits.
Step-by-Step Method to Free a Stuck Seacock
Freed by salt deposits and impatience, I developed this sequence after my cooling intake incident. It works.
Stage One: Penetrating Oil
Apply a quality penetrating oil around the valve stem where it enters the body. I use Liquid Wrench or PB Blaster — both work better than WD-40 because they have heavier solvents that break through salt crystallization. Don’t spray it randomly. Target the stem, the handle connection point, and any visible gaps where the stem meets the valve body. Use about 1 ounce per valve, enough to saturate but not stream everywhere.
Let it sit. Minimum four hours. Better overnight. The oil needs time to work into the crystalline structure. On my boat, I now do this in the evening and tackle it the next morning.
Stage Two: Gentle Cycling
After soaking, try the handle again with steady, gentle pressure. Turn toward the open position only — never force it closed because that risks driving corrosion deeper into the valve mechanism. Apply pressure for 10 seconds, release, wait 30 seconds, repeat. You’re not trying to open it fully yet; you’re breaking the corrosion bond gradually.
If it budges slightly, reapply penetrating oil and wait another two hours. If it’s completely immobile, move to Stage Three.
Stage Three: Heat (When Safe)
Moderate heat can expand the bronze valve body enough to relieve pressure on the stem. Use a heat gun set to 300°F, not a torch. Apply heat for 60 seconds, focusing on the valve body itself, not the handle. Let it cool slightly, then try the handle again with gentle turning pressure.
Only do this if your valve is above deck and away from fuel lines, vinyl upholstery, or electrical components. If it’s in an engine compartment surrounded by hazards, skip this step.
Stage Four: Mechanical Advantage
If the valve handle is small — most seacock handles run two to four inches — extend your leverage. Slip a length of PVC pipe or wooden dowel over the handle. I keep a 24-inch length of half-inch PVC in my tool kit. This gives you a 6:1 mechanical advantage without increasing the force required at the stem. Apply steady, deliberate pressure. No sudden jerking. Seacock stems are made to rotate, but they’re not made to absorb shock loads.
This is where patience separates success from damage. Spend 10 minutes applying gentle rotating pressure with extended leverage before moving to anything more aggressive.
Stage Five: Re-soak and Repeat
If it still won’t move, reapply penetrating oil and wait 24 hours. I know it sounds slow. It is. But I’ve freed valves this way that seemed permanently stuck after just two soak cycles.
Once the valve begins moving, cycle it gently through its full range several times to distribute fresh oil throughout the mechanism. Don’t close it completely yet — just establish movement.
Prevention So It Never Sticks Again
After you’ve freed the valve, establish a maintenance routine. Every two weeks at sea, open and close each seacock through its full range. This keeps the stem lubricated and prevents salt from settling into the mechanism. Takes 30 seconds per valve. Worth every second.
Replace your zinc rod every 18 to 24 months, regardless of how it looks. Most cruisers leave them until they’re nearly gone, which means your bronze is already corroding. A replacement zinc costs $40 to $80 and takes 10 minutes to install. A replacement seacock costs $150 to $400 plus haulout fees if you can’t do it at anchor.
Once a year, I flush my seacocks with fresh water and apply a light coat of waterproof grease around the stem. Use marine grease, not regular lithium grease — marine formulations resist salt and temperature swings better. Brands like Yamaha Marine Grease or Tef-Gel work well. A $15 cartridge lasts for multiple applications across your boat.
Check your through-hull fittings themselves. Corrosion around the external collar indicates a failing fitting. Those need replacement, but it’s a separate project than freeing a seized valve.
When to Call the Boatyard vs. Solve It Yourself
Some valves genuinely can’t be saved without hauling. If the stem is visibly stripped — the handle spins but nothing happens — the valve is dead. If you hear cracking sounds or feel internal grinding that doesn’t improve with heat and oil, the stem has likely fractured internally. If the valve opens but leaks constantly through the handle, the packing nut is compromised.
These situations demand valve replacement. A boatyard haul for a single seacock replacement typically costs $600 to $1,200 including labor. Doing it yourself while afloat requires the right tools, confidence, and a manageable sea state. Many cruisers choose the boatyard. I’ve done it myself twice, and honestly, the second time I would’ve paid for professional help.
But most stuck seacocks — the ones that bind but don’t rattle internally, don’t leak, and haven’t been forced — will free up with this method. I’ve documented successful releases on forums where sailors reported complete failure after hauling. The key is patience and sequential steps rather than aggressive forcing.
Budget your time. You’re looking at 24 to 48 hours of waiting time with maybe 30 minutes of active work. That’s a small price for avoiding a hauling fee and keeping your boat self-sufficient at sea.


Stay in the loop
Get the latest sail the seas mag updates delivered to your inbox.