Sailboat Watermaker Not Producing Pressure — Fix It
Watermaker troubleshooting has gotten complicated with all the conflicting advice flying around online. As someone who completed a five-year circumnavigation and replaced the same membrane twice mid-passage, I learned everything there is to know about high-pressure system failures. Today, I will share it all with you.
I was 180 miles offshore — becalmed in the trades, genuinely nowhere to go — when ours quit cold. The pump ran. The motor hummed. Zero output at the cabin outlet. That distinction between “low pressure” and “no pressure” probably saved me from throwing $1,200 at a membrane cartridge I didn’t need to replace. I’ve now run this exact diagnosis sequence on three different boat models, twice in actual emergency conditions.
So, without further ado, let’s dive in.
What Low or Zero Pressure Actually Tells You — Raw Data for Your Next Move
Before you touch anything, just listen to what the system is doing.
Pump running but nothing coming out? That’s zero-pressure mode. Water trickling through while the gauge reads 800 psi instead of your normal 900-plus? That’s low-pressure mode. These are not the same failure — not even close. One points at the intake or membrane. The other points at pump degradation or electrical weakness.
Skipping this step costs real time. I’ve met cruisers who swapped perfectly good membranes because they never confirmed whether the pump was building pressure at all. Check the cabin outlet first. Nothing coming out, move to the intake. Weak flow, suspect membrane wear or pump fatigue.
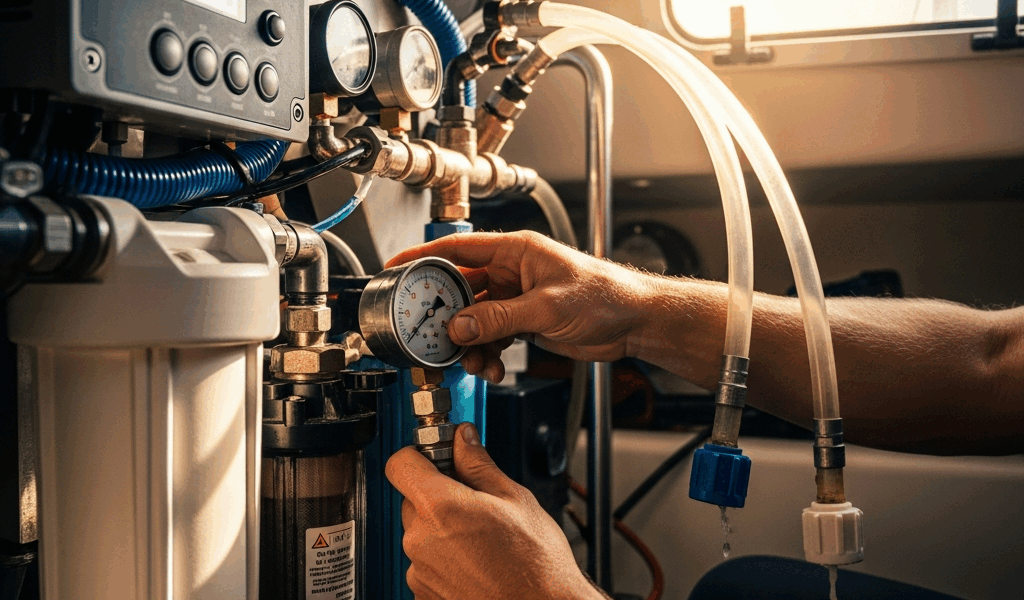
The pressure gauge on your panel is worth its weight in fresh water, honestly. Don’t have one? A portable test gauge runs about $40 and plugs straight into the discharge line. Bring one offshore. Don’t make my mistake of leaving without it.
Check the Pre-Filters and Raw Water Intake First — The Most Common Win
Clogged pre-filters are why your watermaker isn’t producing pressure roughly 60 percent of the time. That’s not a guess — that’s just what the numbers look like after enough passages.
Sediment and carbon filter cartridges live inside plastic housings, usually mounted near the engine room or somewhere aft of the galley. Shut everything down completely. Open the seacock isolating the intake. Turn the filter housing counterclockwise by hand — or grab a strap wrench if it’s seized — and pull it off.
Look inside. Brown cartridge? Compressed? Replace it. Most cruisers carry two spares already. A fresh 5-micron sediment filter and a 10-micron carbon cartridge run about $60 total and solve more pressure problems than any other single maintenance item on the boat.
While you’re in there, check the raw water strainer basket upstream. I once pulled out a plastic shopping bag wrapped tight around the pickup — strangling flow to nothing. Another time it was sea lettuce compressed into this dark, genuinely foul-smelling mass. Four minutes to remove and rinse. Prevents hours of downstream troubleshooting.
One rule that is non-negotiable: never run the pump dry. Not even briefly. Running a high-pressure pump without feed water destroys the internal seals within minutes — the motor spins at 1,800 rpm and without liquid cooling, the seal faces fry almost immediately. I watched it happen once. Pressure dropped from 900 to 200 psi over two hours, and I ended up rebuilding the pump at sea with parts I barely had. Not fun.
Always confirm water flows freely into the pre-filter housing before you energize anything.
Test the High-Pressure Pump for Wear or Air Ingestion — The Second-Tier Diagnosis
Water reaching the pre-filters but pressure still low or zero? The pump itself may be failing — or sucking air. These feel like the same problem but they’re not.
Air bubbles in the feed line prevent the pump from building pressure at all. Look for a sight glass or clear tubing section between the strainer and pump. Bubbles visible? That’s your culprit. Check the seacock and every hose connection for even minor weeping. Tighten loose fittings. Bleed the line by cracking the downstream isolation valve, letting water run for about 30 seconds, then closing it and restarting.
No sight glass? Make one. Shut down, disconnect the feed line where it enters the pump, and splice in a 12-inch section of clear vinyl tubing — 5/8-inch ID, about $2 at any hardware store. Route it into a bucket and start the pump. No bubbles should appear. Foam or visible air pockets means you have an intake leak somewhere upstream.
High-pressure pumps wear. Pressure that builds then falls back suggests internal leakage. Rattling on startup points to worn bearings. With a pressure gauge, watch the rise time — a healthy pump hits 900 psi in under 15 seconds and holds it steady. Gauge creeping upward slowly, or fluctuating without settling, means the pump is on its way out.
Pump replacement runs $800 to $1,400 depending on model. Service kits run around $200. That’s exactly why you diagnose everything else before assuming it’s the pump.
Inspect the Membrane for Fouling or Salt Scaling — The Mid-Passage Reality
Membranes foul. Salt deposits, biological slime, calcium carbonate — all of it eventually crusts onto the cartridge and restricts flow. This is just what happens.
Pressure low but the pump builds it fine? Suspect the membrane. Remove the cartridge housing — same strap-wrench operation as the pre-filters. The cartridge itself runs $600 to $900 and lives inside a stainless steel or fiberglass pressure vessel. Unscrew it and actually handle it.
A fouled membrane feels rough or faintly slimy. A clean one is smooth. If you haven’t run fresh-water flushes in the past month, it’s probably fouled. This is the boat equivalent of home maintenance — skip it and things stop working. No mystery there.
Fresh-water flush procedure: close the seacock, isolate the raw-water intake, connect a tank of clean fresh water to the feed line, run the system for five minutes. Dissolves salt deposits, extends membrane life significantly. Do this every two weeks underway — at least if you want the membrane to last more than one season.
Chemical cleaning with citric acid handles moderate fouling reasonably well. Mix 50 grams of food-grade citric acid powder into two liters of fresh water, run it through for 15 minutes, then flush thoroughly. But honestly — membrane over three years old and already showing low pressure? Replacement makes more sense than chemical rehab at that point.
Probably should have opened with this section, honestly: glycerin pickling during storage adds years to membrane life. Poor storage kills membranes in months. Store it right or budget for early replacement.
Electrical and Pressure Switch Faults to Check Last — The Final Diagnostic Tier
Low voltage causes low pressure. It’s the last thing you check because it’s usually not the problem — but when it is the problem, it’s deeply annoying to have missed.
Use a multimeter to check voltage at the pump motor terminals while the system runs under actual load. You want 11 volts minimum on a 12V system, 22 volts minimum on a 24V system. Voltage sagging below that means weak batteries or undersized wire gauge. A single bad connection adds enough resistance to kill pressure entirely.
I’m apparently sensitive to corroded connections in a way other cruisers aren’t, and dielectric grease works for me while ignoring terminals never does. Check the pressure switch — the device that cuts the pump off at target pressure — for corrosion on the terminals. Use contact cleaner and a small brush. Saltwater air eats electrical connections alive, full stop. I’ve replaced corroded pressure switches for $150 that a five-minute cleaning with Deoxit D5 would have saved entirely. Don’t make my mistake.
That’s the sequence. Intake and filters first. Pump wear second. Membrane third. Electricity last. This order has never failed me across three boats and more miles than I’d like to count — and it’ll save you money every single time you run it.


Stay in the loop
Get the latest sail the seas mag updates delivered to your inbox.